
_-|
Neon NVG NT350 Differential Installation / Swap |-_
Taking the transmission apart:
(1) Drain the lube(save it for future use if its in good condition), remove axles, drop the trans.
(3) Remove the speedometer and all the case bolts. Place two screwdrivers into the slots provided in the case halves near the dowels. Pry the case apart using the provided slots on each end. Separate the case halves. This might require little muscle and some creative wiggling to help release the shafts from their pockets.
(6) Place the bell housing face down and lift up on the gear train half of
the trans. Other way require an assistant to hold the gear train down why you
wiggle and pull on the bellhousing. I don't like this method as when you are
pulling up dirt and other debris can fall inside the gears!!!
(5) Remove output shaft roller bearing from output shaft & rear gear idler spacer (store in safe place!!)
(6) Remove differential assembly & set aside. Stock differential will not
be reused, BUT you will need to remove the ring gear from its perimeter. Those
bolts are held on with red high strength loctite!
Once you have the transmission open you get so see all the guts and glory of it all. You can clean out the magnet on the gear train side. Do not forget to install the magnet. It collects all the bits n pieces and metal dust from the gear lube.
The NEW Differential:
If this is a new differential you will need the following parts.
| Description | Qua. | Part No. |
| Speedo gear | 1 | 4797316 |
| Bearing Cups | 2 | 4567022 |
| Cone Roller bearings | 2 | 4567025AB |
| Mopar Trans fluid | 3 | 4874465 |
| Differential ring gear bolts | 12 | 4761105 |
| Case half sealant | 1 | 4318083 |
| Diff pin retainer brackets ** |
2 | 04800059AA |
| Axle seal | 2 | 4797334 |
** Don't forget to trim the diff pin retainer brackets as shown here
New speedo gears snaps into place. You will need a press as well as large socket or piece of pipe about the same size as the speedo gear to drive it into place. Hammering it on will definitely damage it.
To press the bearing in without having to purchase any additional one-use special tools, locate a socket or other suitable tool that just fits over the OD (outside diameter) of the differential. When you begin to press the bearing on, the rollers should move freely - this tell you you are using right size!. Repeat same procedure on other side.
Since this is a new differential with NEW bearings, you will need to replace both bearing cups. I suggest also replacing the axle seals (not right now!!)
If this is a existing differential: Remove bearing cup and existing shim from clutch bellhousing case.
FSM says: Bearing cups and cones should be replaced if they show signs of pitting or heat distress. If distress is seen on either the cup or bearing rollers, both cup and cone must be replaced. Use extreme care when removing and installing bearing cups and cones. Use only a press for installation, as a hammer may not properly align the bearing cup or cone. Burrs or nicks on the bearing seat gives a false end–play reading while gauging for proper shims. If the cone bearing and cups are not seated properly they will fail very quickly. Replace bearings as a pair: If one differential bearing is defective, replace both differential bearings, if one input shaft bearing is defective, replace both input shaft bearings. Bearing cones must not be reused if removed. (This means that if you remove bearing off the end of the differential, it is permanently damaged and UNUSABLE)
lf you have a bearing install tool this job is a little easier. As a back up method use the old bearing face to face and a block of wood to drive the bearing home.
DIFFERENTIAL BEARING PRELOAD ADJUSTMENT
(1)Oil differential bearings with Mopar Manual Transaxle Fluid Lube the cone rollers on the new differential with Mopar 4874465
(2) Install differential assembly in transaxle gear case. Set the quaife in the gear train half of the trans without the ring gear!!
FSM says: Bearing preloads and drag torque specifications must be maintained to avoid premature bearing failures. Used (original) bearings may lose up to 50% of the original drag torque after break–in. All bearing adjustments must be made with no other component interference or gear intermesh. (This means you need to REMOVE the ring gear from the differential when setting preloads and measuring turning torque).
(3) Reassemble the case halves. Leave out the reverse gear idler washer and caged shaft bearing for ease of assembly. It's easier to assembly the tranny at this point if you leave out the caged bearing - don't forget it later on!!! Install clutch bellhousing over gear case. Wiggle till it drops into position. You can try to align the shifter rails with their slots for faster assembly. It will drop into place leaving virtually no gap all the way around. DO NOT FORCE IT SHUT! Doing so will permanently damage and destroy the transmission. Be patient.
(4) Bolt the case together using enough bolts to hold it securely (7 or 8). I do every other one around the differential. Using the torque measuring tool (which looks like a small diameter tail pipe expansion tool) turn the differential left and right 3 or 4 times, flip the trans over and repeat the procedure. Torque case bolts to 29 N·m (21 ft. lbs.).
(5) Turning–torque readings should be obtained while smoothly rotating in either direction. Position transaxle with bellhousing facing down on workbench. Position dial indicator.
(6) Apply a medium load to differential with Tool C-4995 and a T-handle, in the downward direction. Roll differential assembly back and forth a number of times. This will settle the bearings. Zero the dial indicator. To obtain end play readings, apply a medium load in an upward direction while rolling differential assembly back and forth Record end play.
Set up your end play indicator to measure end play. As you can see in the photos I used a dial caliper and a wrench. Whatever you use, take 5 or 6 measurements and take average of the repeatable numbers.
(7) The shim required for proper bearing preloads is the total of end play, plus (constant) preloads of 0.18mm (0.007 in.). Never combine shims to obtain the required preloads.
End play + Preload = Desired shim thickness
(8) Remove case bolts. Remove clutch bellhousing differential bearing cup. Install shim(s) selected in Step 7. Then press the bearing cup into clutch bellhousing.
(9) Install clutch bellhousing. Install and torque case bolts to 26 N·m (19 ft. lbs.).
(10) Using Special Tool C-4995 and an inch-pound torque wrench, check turning torque of the differential assembly . The turning torque should be 6 to 12 in. lbs. If the turning torque is too high, install a 0.05mm (0.002 inch) thinner shim. If the turning torque is too low, install a 0.05mm (0.002 inch) thicker shim.
(11) Recheck turning torque. Repeat Step 10 until the proper turning torque is obtained. Once proper turning torque has been established, place gear case on the end plate. Draw a bead of Mopar Gasket Maker, LocTite 518, or equivalent, on the flat surface of the case mating flange. Install clutch bellhousing onto gear case. Install and tighten case bolts to 29 N·m (21 ft. lbs.).
(16) Repeat until desired turning torque is achieved.
(17) Split the cases, remove the quaife and now you can take ring gear off the old differential and install it on the quaife. The ring gear is a tight fit, so use a mallet or remove it from the stock differential. To install on the quaife, place it in the oven for few minutes at 250*F.
(18) Install ring gear to the quaife using all new bolts part no. 4761105
(19) Reassemble the cases halves. Don't forget the reverse idler spacer washer, intermediate shaft caged bearing. The sealant for the case halves is LocTite 518 or Mopar 4318083 - NOT RTV SILICONE!!!! Torque all the case bolts to 21 ft-lbs, reinstall, refill with your lube of choice and burn rubber.. 2 tires at a time. A trick I have used when doing final assembly is to put grease on the intermediate shaft shaft bearing on that the rollers are pushed towards the shaft allowing for easier assembly. Due to the weight of the beast, I find it easier to wiggle the bellhousing onto the gear train side of the trans. I put that half in a bucket so it doesn't move on me.
You will notice that upon driving the car that it tends to drive the steering
wheel out of your hands in turns and such. Be careful when driving around with
your new toy. It will definitely require 2 hands on the wheel until you can
become familiar with its behavior.
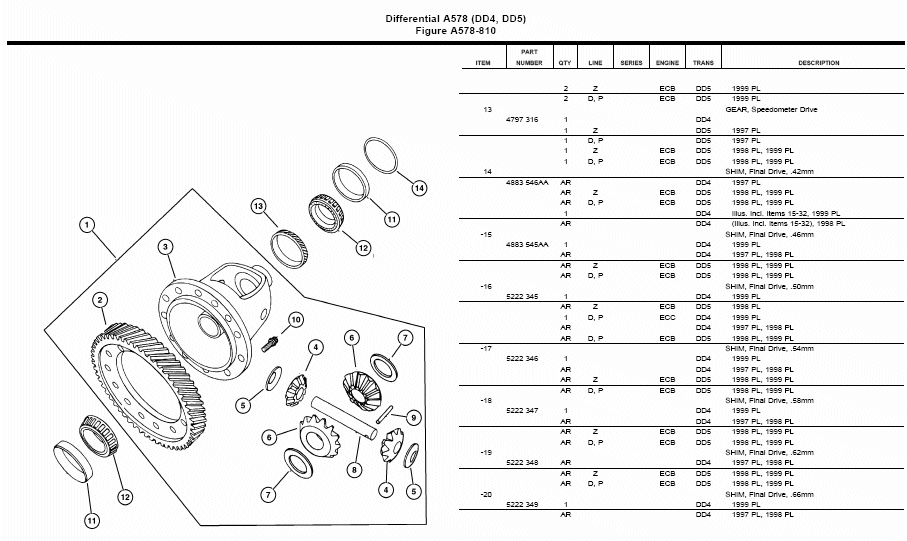
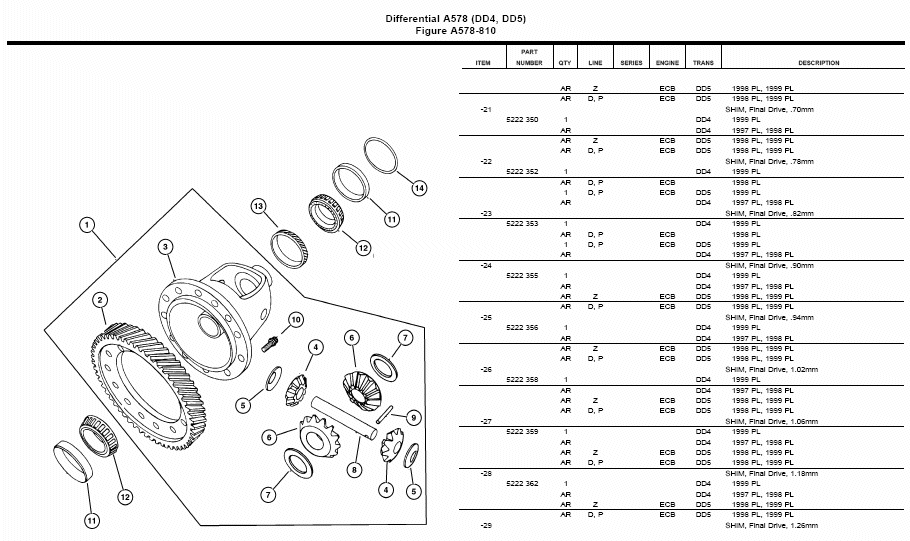
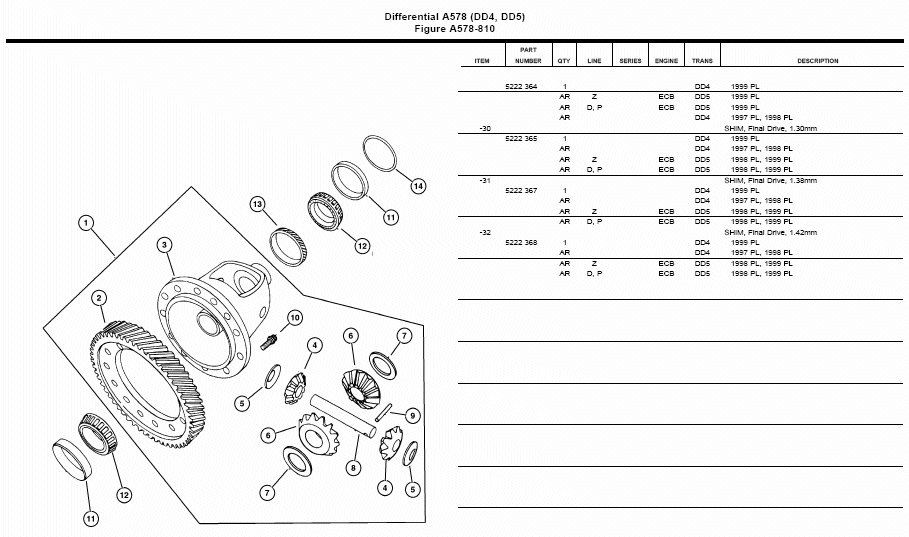
Shim Sizes
| part no. | in. | mm |
| 4883 546AA | 0.0165 | 0.42 |
| 4883 545AA | 0.0197 | 0.46 |
| 5222 345 | 0.0197 | 0.50 |
| 5222 346 | 0.0213 | 0.54 |
| 5222 347 | 0.0228 | 0.58 |
| 5222 348 | 0.0244 | 0.62 |
| 5222 349 | 0.0260 | 0.66 |
| 5222 350 | 0.0276 | 0.70 |
| 5222 352 | 0.0307 | 0.78 |
| 5222 353 | 0.0323 | 0.82 |
| 5222 355 | 0.0354 | 0.90 |
| 5222 356 | 0.0370 | 0.94 |
| 5222 358 | 0.0402 | 1.02 |
| 5222 359 | 0.0417 | 1.06 |
| 5222 362 | 0.0465 | 1.18 |
| 5222 364 | 0.0496 | 1.26 |
| 5222 365 | 0.0512 | 1.30 |
| 5222 367 | 0.0543 | 1.38 |
| 5222 368 | 0.0559 | 1.42 |